New Year, New You, that’s how the saying goes right? Well, while everyone has been making resolutions about eating right and spending less time on their phones, we’ve been thinking more along the lines of New Year, New Shed! And while the bank account isn’t quite full of new shed money there are some things we can do to make the garden shed feel like new, at least on the inside. After another busy year, it’s once again full of clutter. Hammers are in buckets, drill bits missing and spanners are where the screwdrivers should be. If you’re feeling the same and want to start off 2018 with a new start then why not give your shed interior a bit of an overhaul. We all know how annoying it is when you go out to the shed just to get that one thing and end up spending an hour wading through miscellaneous junk and still don’t know where your shovel is. Starting the year off with a clean slate will not only give you that great feeling you get when everything is neat, tidy and has its own place, but also once your shed is in order it’s more likely you’ll want to spend more time in there working on all those projects you’ve been meaning to do for the last year. So to give you a little push in the right direction we’ve put together a few great DIY ideas to get your shed looking ship shape and ready for action.
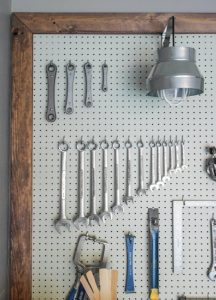
 Making a Simple Pegboard
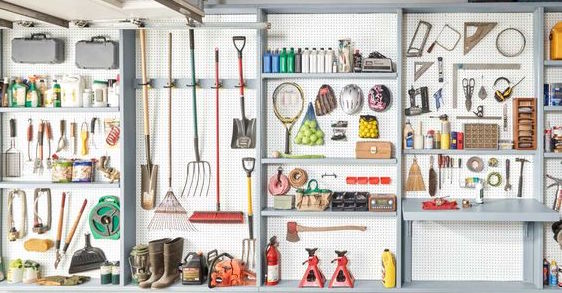
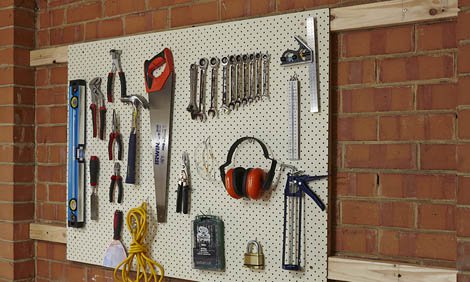
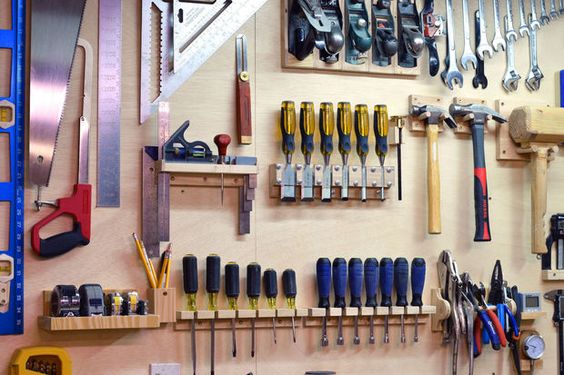
We are going to start with a big one! A pegboard to hold most of your small to medium sized tools, the kind that is always getting misplaced or lost. Having a good pegboard just makes life so much simpler, you can walk into your shed and everything is right there laid out in front of you, you can just grab what you need and when you’re done you’ll know where to put it back, also the empty spaces will tell you if there is anything missing so if you do by chance misplace something after a day of DIY then you’ll know sooner rather than later to have a look for said item.
To start making your pegboard you’ll have to measure up space in your shed. Make sure it’s at a good height so you do not have to use a stepladder to get to things, the whole point of a pegboard is to make it easily accessible. Once you have your dimensions head down to your local hardware store and check out what they have to offer. Some stores will only have precut pegboard, in which case you can purchase the one that comes closest to your dimensions, if it’s a little too big you’ll have to cut it down or if it’s not big enough consider buying two and piecing them together. If you can get one custom cut then that’s even better! Keep in mind you’ll have to build a support frame too so you’re not mounting it straight onto your wall. A few bits of treated pine will work perfectly for this. And of course, don’t forget the pegs!!
First, start by fixing what will be your frame to the wall. You can do this with two horizontal pieces of wood for the top and bottom and then your two vertical pieces a little in from each side to give the middle of the board support. If you’re fixing your frame onto brick then use a Hammer Drill and spaghetti wall plugs into each hole to give the screws extra hold. Make sure you have used your spirit level to balance your frames properly before screwing in. The last thing you want is your tools all tilted to one side!
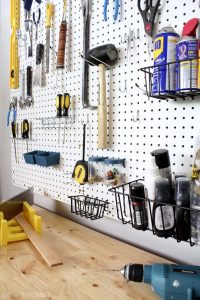
 Now a little tip, it’s actually easier to arrange your tools and peg positions before you mount your pegboard. Put your board on the ground or a large table that you can easily stand over and start to arrange your tools in the position you want them. It’s a little like a game of Tetris, trying to make everything fit together well. Take your time having a play around to get things in space you really like. Once you are happy with this, you can draw around each item with a black permanent marker. This will help remind you where everything goes and it will be easy to spot if something is missing. Once you’ve done that, pop your pegs into position then take off your tools and mount your board.
Now it’s time to attach the pegboard. You can do this by using some simple chipboard screws, make sure you put enough in to carry a fair amount of weight, a spanner might not seem that heavy on its own, but add in a set of them plus hammer and…well you get the picture. Remember to screw the board to the inner vertical frame too to help spread the load.
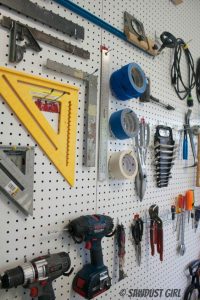
When it’s all up you can now easily pop your tools into their allotted positions, stand back and marvel at your own handy work and how organized your shed is looking already!
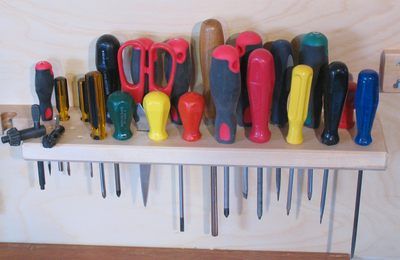
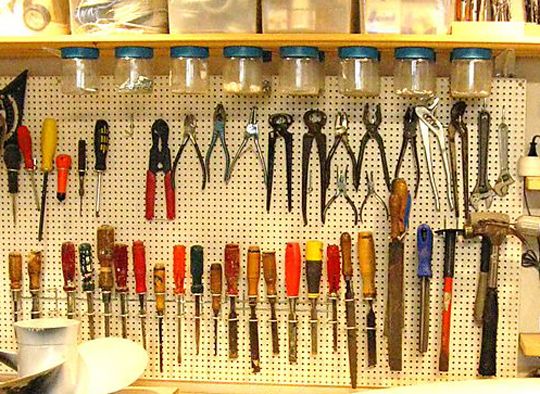
Making a Screwdriver holder
A simple pegboard won’t hold everything because not all of your tools are made to hang. So the DIY is not over just yet! We’ve got a few more ideas to come so that you will truly have a place for everything in your new and improved shed. Let’s start with a screwdriver holder. This is a simple contraption to make and only requires a handful of screws, some pine or the wood of your choice and some drill bits.
Start by getting a piece of wood long enough to hold all your screwdrivers. You can make double rows if you have a shorter piece. Mark out with a pencil where you will drill down and fit the screwdrivers. Make sure you allow enough space in between each hole for the handles, as some screwdriver handles can be chunkier than others. Once you’ve done this select a drill bit that will fit all of the metal shafts but not let the handles slip through, then drill through your wood. You can now attach this to another wooden block to make a T Shape and then screw that either into your pegboard or another space on your wall. And now you have a handy play to keep your screwdrivers.
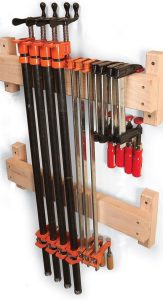 Making a Clamp Rack
Clamps are another one of those things that seem to end up all over the place. So how about giving them a proper home by making a clamp rack. Using a simple I shape design get three wooden blocks, to smaller and run the vertically and one larger and longer and run that horizontally over the top on them, making sure there is room either side on the small blacks to allow space to drill them into your wall. Once they are in place, screw together and find a good bit of wall space at a nice height and attach. Now you will be able to hang your clamps and access them easily.
Getting Creative With PVC Pipe
Amongst your miscellaneous shed items, you probably have some PVC pipe left over from old projects and if so here are a few nifty little ideas that will help organize your space even further, creating places to store those bigger items and also the tiny items that so often roll off your bend and onto the floor to never be seen again!
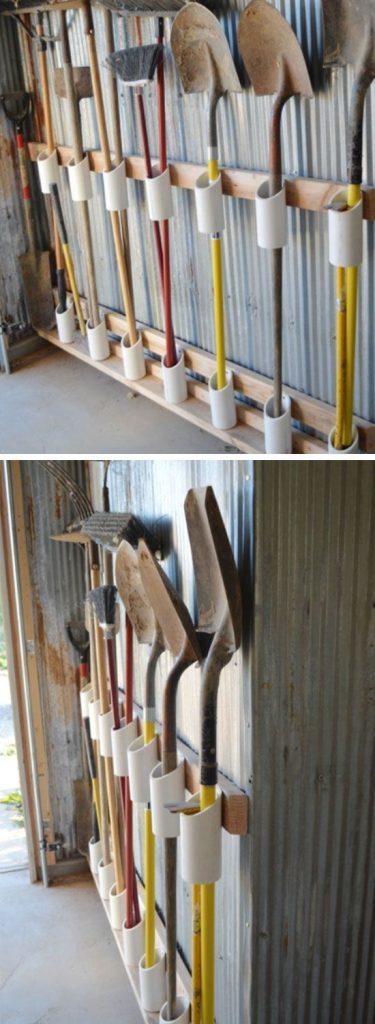 Making a Shovel and Rake Holder
This one is a brilliant idea; a lot more tidy than just hooking them onto a wall where they get bumped off constantly. All you’ll need is some of your PVC pipe (if it happens your one of the tidier people who doesn’t just have it laying around, duck to the hardware store and grab some!) and four lengths of four by two. Usually, the entrance way to your shed or down the back wall is where these are stored, so find your space and measure up your lengths to suit.
Next, you’ll want to cut your pipes at around eight inches on a slight angle to make an easier entrance point and also you’ll have a higher point where it is easier to drill and fix into position. You’ll want one for the middle and one for the bottom of each tool.
Once you’ve cut enough fix them into position on two of the horizontal boards but screwing into the higher piece of pipe. You’ll want to measure your spacing very carefully so that the top and bottom boards line up and correspond with each other.
Now attach these two pieces with the pipes to your wall, again making sure they are level and spaced to their corresponding pipe.
The final touch is creating an L shape Shelf with the remaining pieces of two by four. This little shelf will screw into the wall just under your bottom pipes to allow a resting place for the bottoms of your rake and shovel handles.
And there you have it, a simple and effective solution to stowing your long-handled tools in a way where they can’t be knocked about or accidentally fall.
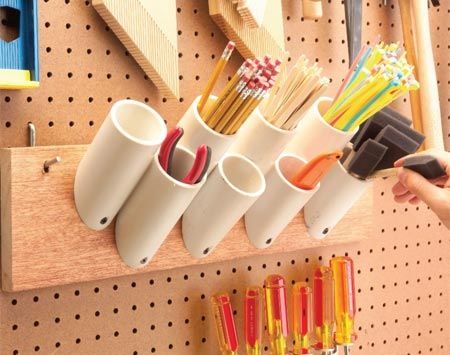
Bits and Pieces Holder
This is another great idea for a place to put pencils, electrical ties, and other little items, it can be made on a small block of wood and then fixed to your pegboard also.
All you’ll need is a block of wood and some smaller PVC Pipe. You can cut your pipe to a uniform length or a few different sizes to custom fit your small lightweight items. Again cut at a 45-degree angle because this time you will be attaching the angled edge to the board with a simple screw through the bottom. Have fun with your design and fit in as many or as little pipes as you like. The best way to store all those random small items that won’t fit anything else.
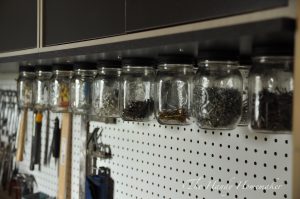 Making Nail and Screw Jars
One other thing you can do to really add to your pegboard and complete your organization is to add the small protruding shelf from the top with nail and screw jars attached. Keeping your nails and screws in these jars is genius. You can do this using glass or plastic jars.
Get a piece of wood that can span your pegboard with enough room to sit comfortably on top of the pegboard frame and be screwed down, while allowing enough overhang for the jars to attach comfortably without rubbing on the pegboard. Once you’ve found your right size take all your lids off the jars and lay them top down on your wood, allowing for enough space between each one to be able to screw the jars on easily. Once you have your spacing right it’s as simple as putting a screw through the middle of each lid to attach it to the wood. Now you can flip your board over and fix it to the top frame. Once it is in place and screwed down, simply fill your jars with all your nails, screws and other bits and bobs and screw onto the fixed lids.
 A Place for Everything and Everything in its Place
Now you’ve got a tidy shed with a place for everything it’s time to get inspired by all the other DIY projects to come. Having an order to your space will make a big change in how fast you are now able to get things done and also how much more likely you are to make what was only days ago, a dreaded trip to the shed! Good luck with all your 2018 projects!